Welcome to my first blog post!
This semester I'll be journaling projects for my OBDF 210: CAD and Digital Fabrication course at
Alberta University of the Arts (AUArts).
Challenge 1: Use basic geometry to build a castle in Rhino.
For the tl:dr version, skip down to the pics!
QUICK BACKGROUND INFO / DISCLAIMER
I am a fourth year undergraduate student at AUArts where I study ceramics in the School of Craft & Emerging Media. This foray into digital design is new for me!
BACK TO POST
During our first class, I furiously scribbled down notes of basic commands to use in Rhino. Simple navigation on how to zoom, rotate, pan, and a lot of new vocab (gumball, osnap, curve, polysurface, Boolean union, Boolean difference, etc.). By the end of class, I was blankly staring at the screen. I was a bit annoyed that my classmates were able to suspiciously follow along seamlessly. OK. So I can get a bit paranoid. And I'm a perfectionist! It's never fun to suck!
The following day, I had art history class in the morning. Afterwards I printed off a few reference images at the library before going back to the computer.
ANOTHER SHORT TANGENT
Coincidentally, a friend from when I was going to university in Scotland in 2011 contacted me two weeks ago. It was kind of out of the blue and she's been on my mind lately. When I read the assignment handout, I immediately thought of
Duart Castle. Eilidh (friend) and I went on a road trip during our spring break up the west coast of Scotland. We stopped at a bunch of castles (obvs.), and I have this pic of her beside Duart Castle (Fig. 1) in my apartment in Calgary (v. strange because most of my belongings are boxed up in my parents' basement in Prince Edward Island).
BACK TO POST
I decided a
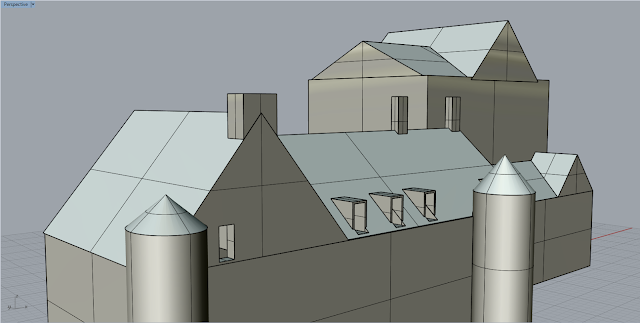
reference photo (Fig. 2) would take away the pressure of designing something and allow me to focus on figuring out how to use Rhino. I worked on the project for three hours and grabbed a screenshot before heading home (Fig. 3).
A few days later, I did a bit of fine tuning by adjusting dimensions, adding chimneys, and cutting out windows (Fig. 4-10).
For this project, the primary shapes are rectangles, triangles, and circles. To create volume, I used the extrude command. To combine or extract volumes, I used the Boolean Union and Boolean Difference commands.
I was able to design a structure which loosely resembles a castle, not bad for my first project.
 |
| Fig. 1. Photo of Duart Castle from road trip in 2011. My friend Eilidh is standing bottom right. |
 |
| Fig. 2. Reference image I found online. |
 |
| Fig. 3. Screenshot of project after 3 hours of work.
|
 |
Fig. 4. Perspective view; display mode set to “Shaded”.
|


